Create a File Share
The Share/Export page lets you create distributed or standard file shares. A distributed share or home share is a repository where the personal files of a user reside, whereas the standard share or general-purpose share is a repository shared by the group. A distributed share is distributed at the top-level directories whereas the standard share is on a single file server VM (FSVM). This section provides information about how to create a file share to perform the UNC/NFS backup for Nutanix Files.
Follow these steps:
- Log into Nutanix Prism web portal.
- Navigate to File Server on the main menu, and then click Share/Export on the File Server dashboard.
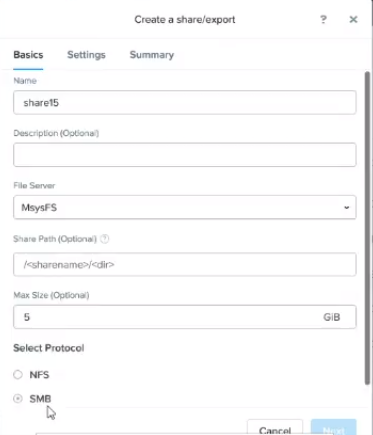
- The Create a share/export window appears displaying the Basics tab.
- On the Basics tab, do the following, and then click Next:
- Name: Enter a name for the share.
- Note: The naming conventions for the share name are as follows:
- Each name must be unique.
- Names are not case-sensitive.
- Files allow unicode characters.
- Maximum name length is 80 characters.
- A blank space or space character cannot appear as the first or last character in the name.
- Names that end with the $ are hidden shares.
- Description (Optional): Enter a description for the share if required.
- File Server: From the drop-down list, select a file server in which the share resides.
- Share Path (Optional): Provide the file path to the share.
- Max Size (Optional): Enter the maximum share size. By default, the size is in GiB.
- Select Protocol: Select SMB as a protocol.
- Note: To enable the multiprotocol feature, select the Enable multiprotocol access for NFS check box.
-
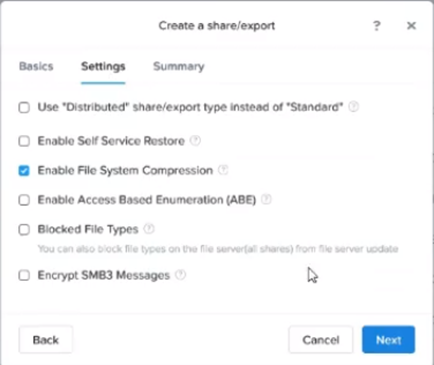
- On the Settings tab, retain defaults or make changes as needed, and then click Next.
- Use “Distributed” share type instead of “Standard”
- Lets you create a distributed share.
- Note: By default, the shares on single-FSVM deployments are standard.
- Enable Self Service Restore
- Lets you restore files from previous snapshots.
- Enable File System Compression
- Lets you save space and reduce data on the share through in-line compression of written data.
- Note: Make sure to disable compression at the container level. If you enabled the compression, the Enable File System Compression option gets disabled.
- Enable Access Based Enumeration (ABE)
- Lets you enable Access-Based Enumeration (ABE).
- Blocked File Types
- Lets you specify the blocked file types.
- Enter a comma-separated list of file types that you want to block from the share.
- Encrypt SMB3 Messages
- Lets you enable message encryption between the file server and the client.
-
- On the Summary page, verify the details, and then click Create.
-

- Note: To make changes to the settings of the previous pages, click Back.
- The file share is created successfully.
- Note: Next, copy the mount path and then map the newly created share in the local UDP. For more information, see Step 6 (a1) of Specify the Source.