Specify the Source
The Source page lets you specify the source nodes that you want to protect. You can select more than one node in a plan. If you have not added any nodes to the Console, you can add nodes when you create or modify a plan from the Source page. You can save a plan without adding any source nodes. The plan gets deployed only after you add source nodes.
Follow these steps:
- Click the Source tab and add a backup proxy server.
- The proxy server is a node where you install the Arcserve UDP Agent (Windows). If the Agent is not installed on this proxy server, when you save the plan, the agent is deployed to the proxy server. The agent deployment setting is in the Agent Installation task in the plan.
- If Backup Proxy is already added, select the backup proxy from the drop-down list.
- If the backup proxy is not added, then click Add.
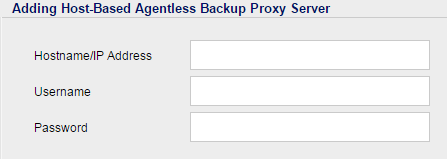
- The Adding Host-Based Agentless Backup Proxy Server dialog opens.
- Specify the proxy server details and click OK.
- You do not have to add the port number and protocol. The port number and protocol are configured on the settings tab of the Console.
- Note: When you modify a plan by changing the Backup Proxy but the nodes included in the plan have jobs running, the plan deployment fail. Follow these steps to change proxy of a plan:
- Pause the plan.
- Wait until all the nodes in the plan complete the running backup jobs. (Or, you can cancel the running jobs).
- Change the proxy of the plan and save it.
- Resume the plan.
- Click Add Nodes to select one of the following options to add nodes that you want to backup:
- Specify the Hyper-V server details, select how you want to browse the VMs in the Inventory drop-down list box (Hosts and VMs, Storages and VMs), and click Connect.
- Expand the Hyper-V hierarchy tree to perform the following options:
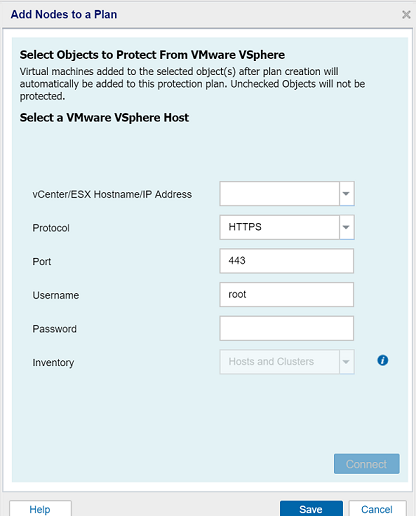
- Specify the vCenter/ESX server details, select how you want to browse the VMs in Inventory drop down list box (Hosts and Clusters, VMs and Templates, VMs and Tags), and click Connect.
A vSphere hierarchy tree is displayed.
Note: Consider the following:
- The VMware Virtual Disk Development Kit (VDDK) 6.x.x is bundled with Arcserve UDP 7.0. But, VDDK 6.x.x does not support HTTP. Also, vCenter and ESX support HTTPS connection only by default.
- Select HTTPS Protocol, if you want to manually replace the built-in VDDK 6.x.x with another version of VDDK, and to configure vCenter/ESX to allow HTTP connection manually.
- Expand the vSphere list to add the following:
- Note: Depending upon what is selected in the Inventory drop-down list, different hierarchy tree views are displayed - Hosts and Clusters, VMs and Templates and VMs and Tags. You can switch among different tree views by clicking the buttons on the top-right side of the tree.
- Add an individual VM
Select the check box of the VM that you want to add from the list, and click Save.

- Add a VM container object
Select the check box of the container that you want to add from the list, and click Save. While you select the container to protect, you can also clear selection of a child VM or child VM container object that is under it. As a result, the child VM or child VM container object is excluded from protection.
Note: Arcserve UDP uses vCenter/ESX name and vSphere MoRef ID (Managed Object Reference ID) to uniquely identify the VM container object in the vSphere list. This allows you to add the same VM container object to plan more than once.
For example:
- Add a VM container object to a vCenter by connecting to vCenter using its host name, and then add the same VM container object again by connecting using the vCenter IP address.
- Add a VM container object to a vCenter, and then add it again from the ESX host directly.
Important: Arcserve UDP does not support adding the same VM container object to a plan twice, as it may cause unpredictable behaviors.
- Add an individual VM
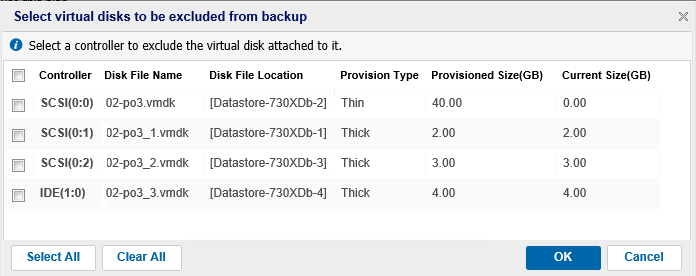
- (Optional) Select virtual disk that you can exclude from the backup job.
- After adding a VM node into plan, click on the Configure button available at the right side of node.
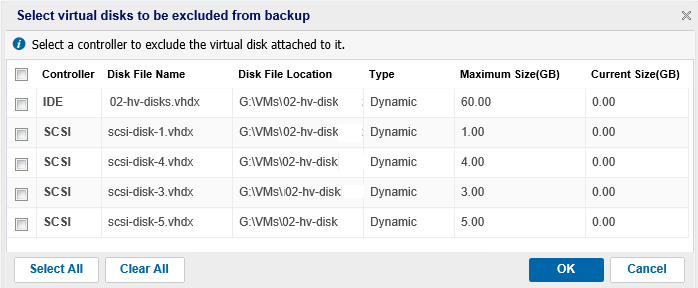
- Select the check box for the virtual disk that you want to exclude from backup and click OK to save.
- Virtual disk is excluded by the controller, instead of the name of virtual disk file.
- If the virtual disk containing the system volume of guest OS is excluded by backup, restored VM cannot boot up.
- If the VM has application (SQL Server or Exchange) installed and any virtual disk is excluded by backup, the DB level restore is not allowed.
- (Optional) Select the Use selected network for backup traffic checkbox and follow these steps:
- To enable communication between the Windows Proxy and Hypervisor Server, select the CIDR network from the drop-down menu.
-
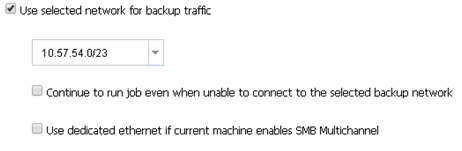
- If you want the backup task to continue even if the selected network is unavailable between Proxy Server and Hypervisor, select the Continue to run job even when unable to connect to the selected backup network checkbox.
- To define the constraint on SMB Multichannel so that the data transfers only through selected network, select the Use dedicated ethernet if current machine enables SMB Multichannel check box.
- Notes:
- This option is not available by default. To enable this option, go to the following folder location: C:\Program Files\Arcserve\Unified Data Protection\Management\Configuration\ConsoleConfiguration.xml. Then, modify the modify the value for useDedicatedEthernet as True.
-

- The SMB Multichannel feature is enabled in Windows, by default.
- Specify network settings for Host-based Backup Hyper-V VM Backup:
- Registry setting: SMBSpecifiedIONetwork
- Location: HKEY_LOCAL_MACHINE\SOFTWARE\Arcserve\Unified Data Protection\Engine\AFBackupDll or HKEY_LOCAL_MACHINE\SOFTWARE\Arcserve\Unified Data Protection\Engine\AFBackupDll\VMInstUUID
- Type: Multi string value
- Value Name: SMBSpecifiedIONetwork
- Value Data: String in the form CIDR (ip/maskBitCount)
- Example: 192.168.10.0/24
- If the Hyper-V/Hyper-V Cluster VM disks are residing on the SMB share, then the user can also define another network to be used for data transfer between the SMB server and the proxy machine.
- Note: The mapping between the specified IP and SMB Server hostname must be registered in the domain.
- (Optional) Select one of the following quiescing methods for VMware. These options are applicable for VMware only.
- Notes:
- The Microsoft VSS inside VM option does not support the application database level and granular level of restore.
- Both the quiescing methods are not applicable when the virtual machine is powered off. If a backup job is initiated when the virtual machine is powered off, the backup job ignores both the quiescing methods.
- For both the quiescing methods, if the backup job cannot continue for any reason (for example, the credentials are incorrect), Arcserve UDP fails the backup job. For more information about the backup job failure, see the troubleshooting topic
- (Optional) Select one of the transport methods for VMware. These options are applicable for VMware.
- Note: If you have specified the transport mode in both the Console and registry key, then the priority set from the Console overrides the priority set in the registry key. For more information on setting the priority using the registry key, see Define a Transport Mode for Host-Based Agentless Backup and Restore.
- (Optional) Select Hyper-V snapshot method. These options are applicable for Hyper-V only.

Select Nodes to Protect
Opens the Select Nodes to Protect dialog and you can select the nodes from the displayed list. Select this option if you have already added the nodes to the Console.
Add Nodes from a Hyper-V
Opens the Add Nodes to Arcserve UDP Console dialog. You can add individual VM nodes or VM container objects (including the Hyper-V cluster, the Hyper-V host, the storage location) to a plan. Once you add a VM container object to the plan, the plan protects all the assigned VMs automatically. When a new VM is created under the VM container object or moved to the VM container object from other place, Arcserve UDP protects the VM without manual intervention. If the VM is deleted from the VM container object (or moved out of the VM container object), Arcserve UDP stops protecting the VM.
To add a VM container object into a plan, follow these steps:
A Hyper-V hierarchy tree is displayed.
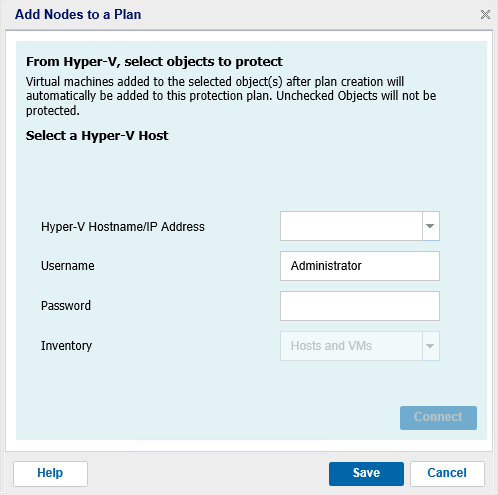
Note: Depending upon the selection in the Inventory drop-down list, different hierarchy tree views are displayed - Hosts and VMs or Storages and VMs. To switch between different tree views, click the buttons on the top-right side of the tree.
i. Add an Individual VM
Select the check box of the VM that you want to add from the list, and click Save.
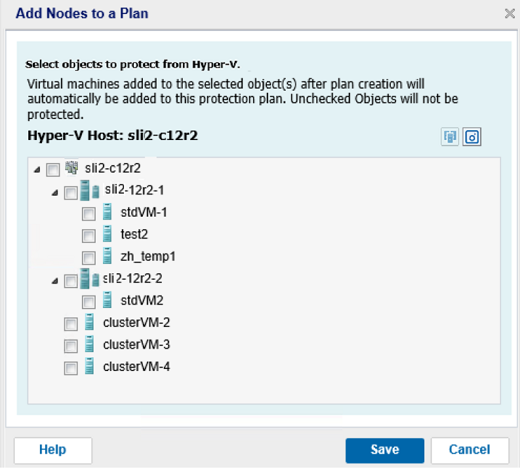
ii. Add a VM container object
Select the check box of the VM container object that you want to add from the list, and click Save. While you select the VM container object to protect, you can also clear selection of a child VM or child VM container object available below the object. As a result, the child VM or child VM container object is excluded from protection.
Note: Arcserve UDP uses Hyper-V cluster/host name, volume name or SMB share name to uniquely identify the container object in the Hyper-V list. As a result, you can add the same VM container object to plans more than once.
For example, add a Hyper-V host by the host name and then using IP address add the same Hyper-V host again. Another example is to add one SMB share, which uses the host name of the host machine, add the same SMB share, which uses IP address of the host machine.
Important! Arcserve UDP does not support adding the same container object to a plan twice to avoid unpredictable behaviors.
Add Nodes from vCenter/ESX
Opens the Add Nodes to Arcserve UDP Console dialog. You can add individual VM nodes, VM templates or VM container objects to a plan. Once you add a VM container object to the plan, the plan protects all the assigned VMs automatically. When a new VM is created under the VM container object or moved to the VM container object from other location, Arcserve UDP protects the VM without manual intervention. If the VM is deleted from the VM container object or moved out of the VM container object, Arcserve UDP stops protecting the VM.
Note: Apart from the VM container objects that exist in vSphere, Arcserve UDP also considers tag and tag category as VM container object, so that they are added into agentless backup plan. In this case, all VMs and template assigned with that tag are automatically protected. In addition, if an up level VM container object is assigned with a tag, all the VMs under that VM container object are considered to have the same tag virtually. For example, assigning a tag to a resource pool automatically provides the same tag to the VMs of that pool even when they actually do not have any tag assigned in vCenter. In addition, automatic protection by tag is supported for all vSphere versions supported by UDP.
To add a VM container object into a plan, follow these steps:
By default the Agentless backup job backs up the whole VM including all its virtual disks. But, you can specify one or more virtual disks that are skipped during backup.
A dialog box pops up.
Dialog box for VMware VM
Dialog box for Hyper-V VM
Notes:
VMware Tools
Indicates that Arcserve UDP uses the VMware tools for quiescing the virtual machine. If you have used the Microsoft VSS inside VM option in the previous backup job, the first consequent backup job with this option requires the credentials to access the virtual machine. This is because Arcserve UDP removes necessary tools from the VM. In addition, VMware Tools needs to be installed and update to date in the VM.
Microsoft VSS inside VM
Indicates that Arcserve UDP uses Microsoft VSS in the guest OS for quiescing the virtual machine. It is applicable only for virtual machines with Windows guest OS. VMware tools must be installed in the guest OS and the tools must be updated. When you use this option, the virtual machine must be powered on and it must be updated with the built-in administrator credentials. For more information on updating a node, see Update Nodes.
Note: The snapshot provided by VMware using this option may not be application consistent. In other words, the backup generated using this option may not be an application-consistent backup. The workaround is to use VMware Tools snapshot quiescing method, along with disabling the VSS writers MSSearch Service Writer and Shadow Copy Optimization Writer in guest OS of VM before this problem gets fixed.
Take snapshot without guest quiescence if quiescence snapshot fails
Indicates that, when backup job fails to take the snapshot with quiescence option, Arcserve UDP will continue the backup job by taking a snapshot without quiescing the virtual machine.
Let VMware select the best available method
Indicates that VMware selects the data transfer option. You do not have to manually set any data transfer option.
Set method priorities for this plan
Indicates that you can select the data transfer option and set the priority for each option. Use the arrow button to prioritize the transport mode.
VM must be backed up using snapshots generated by Microsoft VSS method
Indicates that Arcserve UDP uses the native snapshot methods of Microsoft - online and offline for the backup job. This is the default option. When this check box is not selected and when both Microsoft online and offline methods are not available, the backup job uses the Arcserve UDP method to back up the virtual machine.
If the Microsoft offline method is used for backup and the virtual machine is required to be in a Saved state, select the VM may be placed into "Saved" state before snapshot is taken check box also. If you do not select this check box, the backup job fails.
Online backup is the recommended backup method because it supports the application consistent backup without the downtime of the virtual machine. The virtual machine is accessible during the backup. The online backup method must satisfy some prerequisites such as integration services must be installed and running. If any of the prerequisites are not satisfied, then only the offline backup method is used.
The Microsoft offline backup method has two approaches - save state approach and checkpoint approach. If the Hyper-V host has the Windows 2012R2 operating system with KB 2919355 or later, then the checkpoint approach is used; else the save state approach is used.
The major difference between these two approaches is that the save state approach requires the virtual machine to be inaccessible for a short time. The virtual machine must be placed into a saved state for a few minutes while taking the snapshot.
Apart from the Microsoft native snapshot methods, Arcserve UDP has its own snapshot method that can be used when the Microsoft native snapshot methods are not available.
Note: Both Microsoft offline method and Arcserve UDP method are crash-consistent backup methods. Both the methods cannot guarantee data integrity. The main difference between the methods is that the Microsoft offline method can be compared to the state that VM has been powered off abruptly whereas the Arcserve UDP method can be compared to the state that Hyper-V host has been powered off abruptly.
VM may be placed into "Saved" state before snapshot is taken
Indicates that the virtual machine is placed in the Saved state, if required, before taking the VSS snapshot. Select this option when the virtual machine does not support the online backup. If the virtual machine supports the online backup, then even on enabling this option the virtual machine will not be in the Saved state.
The source is specified.