

Note: The following procedure only applies if you are restoring a file/folder from a file copy or file archive cloud location.
The available options are Amazon S3, Amazon S3-compatible, Windows Azure, Windows Azure-compatible, Fujitsu Cloud (Windows Azure), and Eucalyptus-Walrus. (Amazon S3 is the default vendor).
Note: If you are using Eucalyptus-Walrus as your file copy cloud vendor, you will not be able to copy files whose entire path length is greater than 170 characters.
The configuration options for each cloud vendor are similar (with some different terminology), and any differences are described.
The Destination dialog opens.
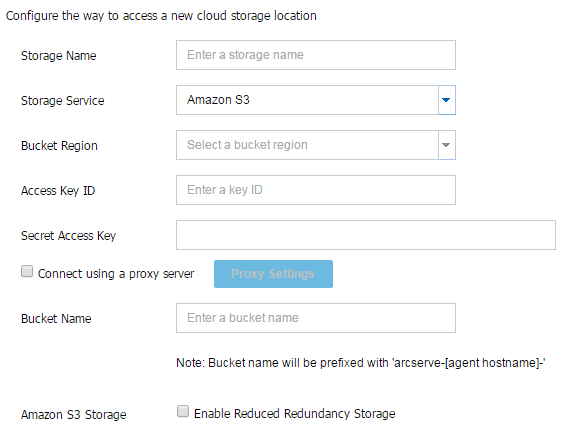
The Cloud Configuration dialog opens.
Specifies the name of the cloud storage. This name will be added to Console for identifying the cloud account. Each cloud account must have a unique storage name.
Select of the service from the drop-down list. The configuration option varies depending on the storage service that is selected.
Access Key ID/Account Name/Query ID
Identifies the user who is requesting access this location.
(For this field, Amazon S3 uses Access Key ID, Windows Azure and Fujitsu Cloud (Windows Azure) use Account Name, and Eucalyptus-Walrus uses Query ID).
Secret Access Key/Secret Key
Because your Access Key is not encrypted, this Secret Access Key is a password that is used to verify the authenticity of the request to access this location.
Important! This Secret Access Key is crucial for maintaining the security of your accounts. You should keep your keys and your account credentials in a secure location. Do not embed your Secret Access Key in a web page or other publicly accessible source code and do not transmit it over insecure channels.
(For this field, Amazon S3 uses Secret Access Key. Windows Azure, Fujitsu Cloud (Windows Azure), and Eucalyptus-Walrus use Secret Key).
Specifies the proxy server settings. Select Connect using a proxy server to enable this option. If you select this option, you must also include the IP address (or machine name) of the proxy server and the corresponding port number that is used by the proxy server for internet connections. You can also select this option if your proxy server requires authentication. You then must provide the corresponding authentication information (Domain Name\Username and Password) that is required to use the proxy server.
(Proxy capability is not available for Eucalyptus-Walrus).
All files and folders moved or copied to the cloud vendor are stored and organized in your buckets (or containers). Buckets are like a container for your files and are used to group and organize objects together. Every object stored at the cloud vendor is placed in a bucket.
(For this field, Amazon S3 and Eucalyptus-Walrus use Bucket Name. Windows Azure and Fujitsu Cloud (Windows Azure) use Container).
Note: For the remainder of this step, all references to Buckets can also be applied to Containers unless specified.
For Amazon S3 only, this option lets you select to enable Reduced Redundancy Storage (RRS). RRS is a storage option within Amazon S3 that helps you reduce cost by storing non-critical, reproducible data at lower levels of redundancy than Amazon S3’s standard storage. Both the standard and reduced redundancy storage options store data in multiple facilities and on multiple devices, but with RRS the data is replicated fewer times, so the cost is less. You should expect the same latency and throughput using either the Amazon S3 standard storage or RRS. By default this option is not selected (Amazon S3 uses the standard storage option).
The cloud account is added to the Console.
|
Copyright © 2016
|
|