Adding a Policy for Agentless VM Backup
Adding a policy for Agentless VM Backup involves multiple steps.
Follow these steps:
- Go to Protect > Policies.
- On the Policies screen, click Add Policy.
- The Add Policy screen appears with three tabs.
- On the left pane, click Basics and do the following:
- Policy Name: Type a Policy Name.
- Protection Type: Select Agentless VM Backup.
- Description (Optional): Type any additional information if required.
- (Optional) On the left pane, click Sources, and then do one of the following:
- To add the available sources, from the Sources drop-down list, click Select Sources. From the displayed list of sources, select the sources you want to add to the policy, and then click Add Source(s).
- To add sources from hypervisor, the Sources drop-down list, click Add Sources from Hypervisor. For more information, see Add Sources from Hypervisor.
- On the left pane, click Tasks and do the following:
- Follow these steps:
- On the What to protect tab, do the following:
- Note: Based on your previous selection in Basics, by default, the Activity Type shows the corresponding activity type. For example, if you have selected Agentless VM Backup to RPS in Basics, the Activity Type is Backup: Host-Based Agentless.
- Backup Proxy: Select one of the available backup servers. If the Backup Proxy server is not available, click Add.
- The Adding Host based agentless Backup Proxy server dialog appears.
-
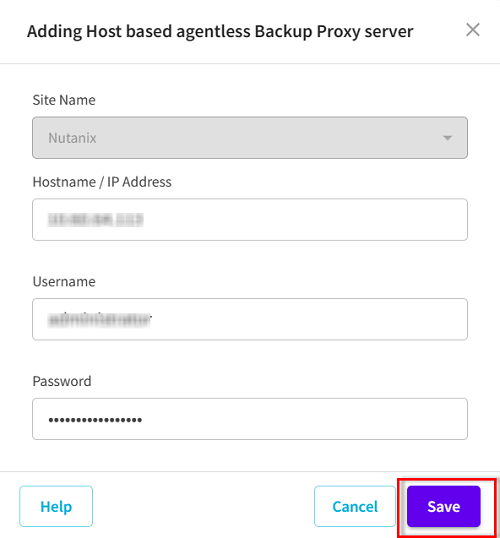
- Specify the proxy server details, and then click Save.
- (Optional) Select the Use Selected Network For Backup Traffic check box, and then select the network from the drop-down list as needed.
- Note: If you want to continue to run job even when the selected network is unavailable, select the Start the job even if unable to connect to the selected destination network check box.
- For VMWare Snapshot Quiescing Method, select one of the following quiescing methods:
- The Microsoft VSS inside VM option does not support the application database level and granular level of restore.
- Both the quiescing methods are not applicable when the virtual machine is powered off. If a backup job is initiated when the virtual machine is powered off, the backup job ignores both the quiescing methods.
- For both the quiescing methods, if the backup job cannot continue for any reason (for example, the credentials are incorrect), Arcserve UDP fails the backup job.
- For VMWare Transport Method, select one of the following options:
- Note: If you have specified the transport mode in both the Console and registry key, then the priority set from the Console overrides the priority set in the registry key. For more information on setting the priority using the registry key, see Define a Transport Mode for Host-Based Agentless Backup and Restore.
- For Hyper-V Snapshot Method, select the following options if required:
- (Optional) For Nutanix AHV Transport Method, select one of the following options:
- Notes:
- Both the quiescing methods are not applicable when the virtual machine is powered off. If a backup job is initiated when the virtual machine is powered off, the backup job ignores both the quiescing methods.
- For both the quiescing methods, if the backup job cannot continue for any reason (for example, the credentials are incorrect), Arcserve UDP fails the backup job.
- On the Where to protect tab, from the Backup Destination Type drop-down list, select one of the following options:
- Follow these steps:
- From the Recovery Point Server drop-down list, select one of the available recovery point servers.
- From the Data Store drop-down list, select the type of destination data store (encrypted or non-encrypted).
- Select the Password Protection check box, type the session password, and then retype the session password to confirm.
- Notes:
- The session password is optional when the backup destination is an unencrypted RPS data store.
- Changing data store converts the next backup job to a Full backup.
- Select the Use Selected Network For Backup Traffic check box, and from the drop-down list, select desired network.
- Note: If you want to continue to run job even when the selected network is unavailable, select the Continue to run job even when unable to connect to the selected backup network check box.
- (Optional) Select the Use Selected Network For Backup Traffic check box, and then do the following:
- To enable communication between the Windows Proxy and Hypervisor Server, select the CIDR network from the drop-down list.
- If you want the backup task to continue even if the selected network is unavailable between Proxy Server and Hypervisor, select the Start to run job even if unable to connect to the selected destination network check box.
- To define the constraint on SMB Multichannel so that the data transfers only through the selected network, select the Use dedicated ethernet if current machine enables SMB Multichannel check box.
- Follow these steps:
- From the Destination path drop-down list, select the destination path as needed, or type the destination path in the following format, and then click Connect:
- \\Hostname\
- The Connect dialog appears.
- On the Connect dialog, do the following, and then click OK:
- Site Name: Select a site from the drop-down list as needed.
- Note: If you have only one site added, then the Site Name field is disabled.
- Username: Specify the user name to connect to the shared folder.
- Password: Specify the password for the corresponding user name.
- The backup destination is validated successfully, and gets listed under the Shared Folders table.
- From the Encryption Algorithm drop-down list, select the type of encryption algorithm that you want to use for backups.
- Notes:
- A full backup and all its related incremental backups must use the same encryption algorithm.
- If the encryption algorithm for an incremental backup has changed, you must perform a full backup.
- For example, if you change the algorithm format and then you run an incremental backup, then the backup type automatically converts to a full backup.
- Provide the encryption password, and then retype the encryption password to confirm.
- From the Enable Compression drop-down list, select the type of compression such as Standard or Maximum.
- Follow these steps:
- For Destination Path, type the destination path of the local network.
- From the Encryption Algorithm drop-down list, select the type of encryption algorithm that you want to use for backups.
- Notes:
- A full backup and all its related incremental backups must use the same encryption algorithm.
- If the encryption algorithm for an incremental backup has changed, you must perform a full backup.
- For example, if you change the algorithm format and then you run an incremental backup, then the backup type automatically converts to a full backup.
- Provide the encryption password, and then retype the encryption password to confirm.
- From the Enable Compression drop-down list, select the type of compression such as Standard or Maximum.
- On the When to protect tab, do the following:
- To add Backup schedule, next to the Backup Schedule heading, click Add.
- The Backup Schedule section refreshes and displays the following fields:
- Schedule Type: From the drop-down list, select one of the following types:
- Daily: Refers to the backup schedule that occurs once a day. For Daily Backups, provide the following details:
- Run Schedule Days: By default, all the days of the week are selected. If you do not want to run the backup job on a specific day, click the day of the week to clear the selected day.
- Start Time: From the hour and minute drop-down list, select the start time for the backup job.
- Weekly: Refers to the backup schedule that occurs once a week. For Weekly Backups, provide the following details:
- Run Schedule Day: From the drop-down list, select a day of the week.
- Start Time: From the hour and minute drop-down list, select the start time for the backup job.
- Monthly: Refers to the backup schedule that occurs once a month.
- Start Day/Week: From the drop-down list, select a day or week of the month.
- Start Time: From the hour and minute drop-down list, select the start time for the backup job.
- Custom: Refers to the backup schedule that repeats multiple times a day.
- Run Schedule Days: By default, all the days of the week are selected. If you do not want to run the backup job on a specific day, click the day of the week to clear the selected day.
- Start Time: From the hour and minute drop-down list, select the start time of the backup job.
- (optional) Click the Repeat check box to provide the details of repeat schedule.
- Every: Type the time in minutes or hours. For example, if you enter 30 minutes, the backup schedule repeats every 30 minutes until the specified end-time.
- End Time: From the hour and minute drop-down list, select the end time for the backup job.
- Backup Type: From the drop-down list, select one of the following types:
- Full: Determines the backup schedule for Full Backups.
- Incremental: Determines the backup schedule for Incremental Backups.
- Verify: Determines the backup schedule for Verify Backups.
- For Retention Policy, provide the following details:
- Daily Backups: Type the number of backups that you want to retain in a day.
- Weekly Backups: Type the number of backups that you want to retain in a week.
- Monthly Backups: Type the number of backups that you want to retain in a month.
- Custom / Manual Backups: Type the number of backups that you want to retain in custom/manual.
- Note: The above options are automatically enabled if you add the corresponding backup schedule.
- For Catalogs, provide the following details:
- To generate file system catalogs after a day, week, month, or others, select the following options:
- Daily Backups
- Weekly Backups
- Monthly Backups
- Custom / Manual Backups
- To add the Merge schedule, next to the Merge Schedule heading, click Add.
- The Merge Schedule section refreshes and displays the following fields:
- Run Schedule Days: By default, all the days of the week are selected. If you do not want to merge jobs on a specific day, click the day of the week to clear the selected day.
- Start Time: From the hour and minute drop-down list, select the start time for the merge job.
- End Time: From the hour and minute drop-down list, select the end time for the merge job.
- To add the Network Throttle schedule, next to the Network Throttle Schedule heading, click Add.
- The Network Throttle Schedule section refreshes and displays the following fields:
- Throughput Limit: Type the throughput limit in Kbps and Mbps unit.
- Run Schedule Days: By default, all the days of the week are selected. If you do not want to run the backup throughput job on a specific day, click the day of the week to clear the selected day.
- Start Time: From the hour and minute drop-down list, select the start time for the backup throughput job.
- End Time: From the hour and minute drop-down list, select the end time for the backup throughput job.
- To add the Disk Read Throttle schedule, next to the Disk Read Throttle Schedule heading, click Add.
- The Disk Read Throttle Schedule section refreshes and displays the following fields:
- Throughput Limit: Type the throughput limit in MB/min and GB/min unit.
- Run Schedule Days: By default, all the days of the week are selected. If you do not want to run the backup throughput job on a specific day, click the day of the week to clear the selected day.
- Start Time: From the hour and minute drop-down list, select the start time for the backup throughput job.
- End Time: From the hour and minute drop-down list, select the end time for the backup throughput job.
- On the Additional Settings tab, do the following:
- Note: For virtual machines in Hyper-V Server 2012 R2 and earlier versions, the transaction log is always truncated after every backup. The above options are only applicable to Windows Virtual Machines in vSphere, Nutanix AHV, or Hyper-V Server 2016 and higher.
- Run Job: The backup job continues when the script returns exit code.
- Fail Job: The backup job stops when the script returns exit code.
- Add one of the following secondary tasks based on the requirement:
- Click Create Policy.
VMWare Tools
Indicates that Arcserve UDP uses the VMware tools for quiescing the virtual machine. If you have used the Microsoft VSS Inside VM option in the previous backup job, the first consequent backup job with this option requires the credentials to access the virtual machine. This is because Arcserve UDP removes necessary tools from the VM. In addition, VMware Tools needs to be installed and update to date in the VM.
Microsoft VSS Inside VM
Indicates that Arcserve UDP uses Microsoft VSS in the guest OS for quiescing the virtual machine. It is applicable only for virtual machines with Windows guest OS. VMware tools must be installed in the guest OS and the tools must be updated. When you use this option, the virtual machine must be powered on and it must be updated with the built-in administrator credentials. For more information on updating a source, see Update sources.
Note: The snapshot provided by VMware using this option may not be application consistent. In other words, the backup generated using this option may not be an application-consistent backup. The workaround is to use VMware Tools snapshot quiescing method, along with disabling the VSS writers MSSearch Service Writer and Shadow Copy Optimization Writer in guest OS of VM before this problem gets fixed.
Take Snapshot without quiescing the guest if creating a quiesced snapshot fails
Indicates that, when backup job fails to take the snapshot with quiescence option, Arcserve UDP continues the backup job by taking a snapshot without quiescing the virtual machine.
Notes:
Let VMWare Select the Best Available Method
Indicates that VMware selects the data transfer option. You do not have to manually set any data transfer option.
Set Method Priorities for this Policy
Indicates that you can select the data transfer option and set the priority for each option. Use the arrow button to prioritize the transport mode.
VM must be Backed up Using Snapshots Generated By Microsoft VSS
Indicates that Arcserve UDP uses the native snapshot methods of Microsoft - online and offline for the backup job. This is the default option. When this check box is not selected and when both Microsoft online and offline methods are not available, the backup job uses the Arcserve UDP method to back up the virtual machine.
If the Microsoft offline method is used for backup and the virtual machine is required to be in a Saved state, select the VM may be Placed into Saved state before Snapshot is Taken check box also. If you do not select this check box, the backup job fails.
Online backup is the recommended backup method because it supports the application consistent backup without the downtime of the virtual machine. The virtual machine is accessible during the backup. The online backup method must satisfy some prerequisites such as integration services must be installed and running. If any of the prerequisites are not satisfied, then only the offline backup method is used.
The Microsoft offline backup method has two approaches - save state approach and checkpoint approach. If the Hyper-V host has the Windows 2012 R2 operating system with KB 2919355 or later, then the checkpoint approach is used; else the save state approach is used.
The major difference between these two approaches is that the save state approach requires the virtual machine to be inaccessible for a short time. The virtual machine must be placed into a saved state for a few minutes while taking the snapshot.
Apart from the Microsoft native snapshot methods, Arcserve UDP has its own snapshot method that can be used when the Microsoft native snapshot methods are not available.
Note: Both Microsoft offline method and Arcserve UDP method are crash-consistent backup methods. Both the methods cannot guarantee data integrity. The main difference between the methods is that the Microsoft offline method can be compared to the state that VM has been powered off abruptly whereas the Arcserve UDP method can be compared to the state that Hyper-V host has been powered off abruptly.
VM may be Placed into Saved state before Snapshot is Taken
Indicates that the virtual machine is placed in the Saved state, if required, before taking the VSS snapshot. Select this option when the virtual machine does not support the online backup. If the virtual machine supports the online backup, then even on enabling this option the virtual machine will not be in the Saved state.
Volume Group (ISCSI)
The Volume Group (ISCSI) transport mode lets you share the storage for clustering between multiple VMs or physical servers. Volume Group (ISCSI) is applicable when proxy exists inside or outside the cluster.
If you want to use Volume Group (ISCSI) transport mode, you must configure ISCSI data services IP in Cluster Details and open the ports 3260 and 3205 on client machine.
Note: Volume Group (ISCSI) is not supported on some of the operating systems. For more information, see link.
Hot Add
The Hot Add transport mode lets you backup virtual machines. The Hot Add transport mode is applicable only when the proxy exists inside the cluster.
Take Snapshot Without Quiescing the guest if Creating a Quiesced Snapshot Fails
Indicates that when backup job fails to take the snapshot with quiescence option, Arcserve UDP continues the backup job by taking a snapshot without quiescing the virtual machine.
Snapshot Type for Backup
Select one of the following options for the backup snapshot:
Use Software Snapshot Only:
Specifies that the backup type uses only the software snapshot. Arcserve UDP will not check for hardware snapshot. The software snapshot utilizes less resources on the virtual machines. You can use this option if the server has lower configurations and processing speed.
Use Hardware Snapshot Wherever Possible:
Specifies that the backup type first checks for a hardware snapshot. If all the criteria are met, the backup type uses hardware snapshot.
User Transportable Snapshot to improve Performance
Specifies that the hardware snapshot uses a transportable snapshot. A transportable snapshot increases the backup throughput. This option is selected by default.
For MS SQL Server Options
Truncate logs
Lets you specify the schedule to truncate logs for SQL Server and Exchange Server. You can specify the schedule as Daily, Weekly, Monthly, or Always. This is applicable only for VMware.
Run a Command
Before a Backup is Started
To run a script before the backup job starts, select the Before a Backup is Started check box, and then specify the path where the script is stored inside the guest OS of the virtual machine.
On Exit Code: To type the exit code, select the On Exit Code check box, type a number, and then select the following:
After a Snapshot is Taken
To run a script after the backup snapshot is taken, select the After a Snapshot is Taken check box, and then specify the path where the script is stored inside the guest OS of the virtual machine. This is applicable only for Windows VM.
After the Backup is Completed
To run a script after the backup job is completed, select the After the Backup is Completed check box, and then specify the path where the script is stored inside the guest OS of the virtual machine. This is applicable only for Windows VM.
Run the Command Even when the Job Fails
If you select this check box, the script specified in the After the Backup is Completed check box is executed even when the backup job fails. Otherwise, that script is executed only when the backup job is completed successfully.
Username
Specify the username to run the commands.
Password
Specify the password to run the commands.
Execute all copy jobs using this task as the source of copy in parallel
Select this check box if you want to execute all the copy jobs using this task as the source of copy in parallel. If you do not select this check box, all the copy jobs run in series (one after the other).
This section contains the following topic: