

After you specify a recovery point to copy, define the copy options to create a copy that combines the previous full and incremental backups for the selected recovery point.
Follow these steps:
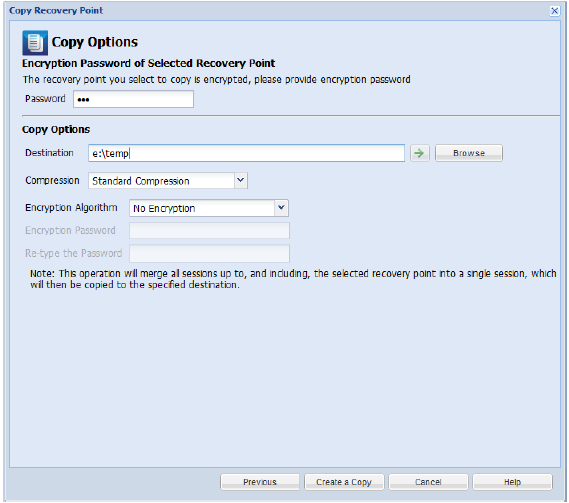
Specify the encrypted password for backup.
Note: This dialog includes two password fields. The upper field is for the password to decrypt the source session, and the lower field is used to encrypt the destination session.
If the recovery point you select to copy was previously encrypted, provide the password.
Specify (or browse to) the storage location of the selected recovery point. (Optional) You can click the green arrow button to verify the connection to the specified location.
If necessary, enter the Username and Password.
Note: The specified backup compression level has no relation with the copy compression level. For example, in backup destination the compression level can be set to Standard; however, when you submit the copy job, the compression can be changed to No Compression or Maximum Compression.
Compression is typically performed to decrease your disk space usage, but also has an inverse impact on your backup speed due to the increased CPU usage.
The available options are:
Note: If your backup image contains uncompressible data (such as JPG images or ZIP files), additional storage space can be allocated to handle such data. As a result, if you select any compression option and you have uncompressible data in your backup, it can actually result in an increase in your disk space usage.
Note: If you change the compression level from "No Compression" to either "Standard Compression" or "Maximum Compression", or if you change from either "Standard Compression" or "Maximum Compression" to "No Compression", the first backup that is performed after this compression level change is automatically a Full Backup. After performing the Full Backup, performs all future backups (Full, Incremental, or Verify) as scheduled.
Specifies the type of encryption algorithm that is used for the recovery point copies.
The available format options are No Encryption, AES-128, AES-192, and AES-256.
Lets you specify and confirm the encryption password being used to encrypt the destination session.
Note: When you enable the encryption, specify a new password. You need this password to restore the copied recovery point.
A status notification window appears and the copy process for the selected recovery point type is launched immediately.
Note: CA ARCserve D2D allows only one recovery point copy job to run at the same time. If you attempt to launch a recovery point copy job manually while running another scheduled copy job, an alert message opens. The message informs you that another job is running and requests you to try again at a later time.
The recovery point is copied from the backup source to the copy target destination.
|
Copyright © 2013 CA.
All rights reserved.
|
|