

Configuring the RHA NAT Utility for Various Network Setups › Example 1: Masters are behind a Closed Firewall › Create a Full System HA Scenario
Create a Full System HA Scenario
Before you create the Full System HA scenario, perform the following steps on Master 1.
- Run the RHA NAT utility from the engine folder.
- Enter the external IP, 155.35.79.139, and port numbers of Firewall 2.
Note: The Control Service and appliance at Site 2 are forwarded from the same external IP (155.35.79.139) with different ports. So you have to add entries for each port as shown:
- 155.35.79.139, 24000
- 155.35.79.139, 25000
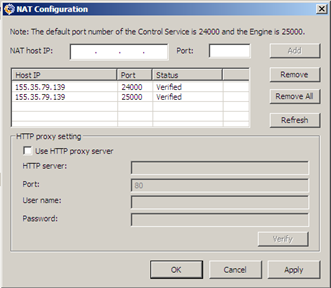
- Click OK to apply the configuration.
- Next, open the RHA Manager and click New on the standard toolbar to create the scenario.
- Select Full System with the product type HA and AR.
- Enter the IP address (192.168.0.112) and the default port number (25000) of the master.
- Enter the IP address (9.181.101.240) of the virtual platform and the default port number (443).
- Enter the IP address (155.35.79.139) of the appliance and the port number (25000). This port has a port forwarding to appliance (9.181.101.199).
Note: If you select Verify Arcserve RHA Engine on Hosts, you get a message that RHA engine is not installed on 155.35.79.139. You get this error message because the verification is processed on Firewall 2.
- Enter details of volume, resource pool, storage, scenario properties, and host properties similar to that of a full system scenario.
- Select the switchover type and run the scenario.
Copyright © 2015 Arcserve.
All rights reserved.
|
|