

Arcserve Backup lets you submit backups consisting of multiple data mover servers to a shared tape library, using staging (D2T2T), in a single job.
The following diagram illustrates how Arcserve Backup processes backups of data mover servers in a single job using staging.

Prerequisite Tasks
To back up multiple data mover servers in a single job using staging
From the Quick Start menu, select Backup.
From the Start tab, click the following:
The backup type is applied to the job.
Important! You cannot specify file system devices as staging devices for UNIX/Linux Data Mover backups. To use a file system device as a staging device for data mover backups, you must specify Normal backup.
The backup source directory tree appears.
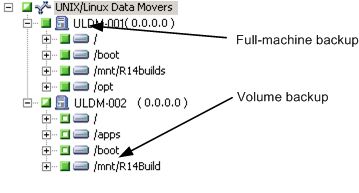
The data mover servers appear.
Click the Schedule tab.
The scheduling options appear.
Note: For more information about scheduling jobs, see Job Customization Methods.
Click the Staging Location tab.
The staging location and group directory tree appears.
Specify the Device Group where you want to stage the backup data.
Note: Click the Device Group to identify the library associated with the group as illustrated by the following screen:

Important! Arcserve Backup prevents you from submitting backup jobs when the data mover server specified on the Source tab does not share the device group specified on the Staging Location tab.
Note: For more information, see How Arcserve Backup Process Backup Data Using Multistreaming.
The migration policy options appear.
Note: For more information, see Specify Migration Policies for Tape Staging Backups.
Note: For more information, see Specify Miscellaneous Options for Tape Staging Backups.
Note: For more information, see Specify Alert Options for Disk and Tape Staging Backups.
Note: For more information, see Specify Postscripts Options for Disk and Tape Staging Backups.
Click the Destination tab.
The Destination directory tree appears.
Specify the device group containing the device where you want to store the data.
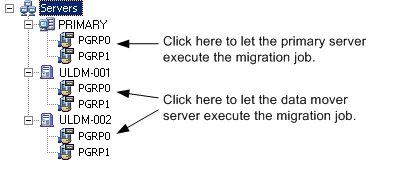
Note: Arcserve Backup lets you execute migration jobs via the primary server or the data mover server. Migration jobs execute from the primary server or the data mover server based on the method used to specify the final destination media, as illustrated by the following screen:
As a best practice, you should apply other options that affect the migration job at this time. For example, to eject the tape from a library after the migration job is complete, click the Operation tab on the Global Options dialog and select the Eject Media option.
Note: For more information about backup options, see Global Backup Options.
The Security and Agent Information dialog opens.
The Submit Job dialog opens.
The job is submitted.
|
Copyright © 2016
|
|