

Installing the Arcserve UDP Appliance › Connect Cables
Connect Cables
To provide power to your appliance, it is important to follow the cable connection steps in the order provided.
Follow these steps:
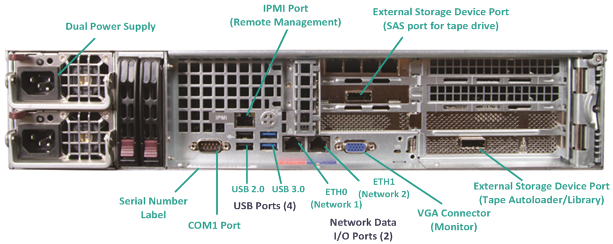
- Connect the network cables (red and blue) to the corresponding network data I/O serial ports. On the front panel, the corresponding network activity LED comes on. (Network 1 LED = ETH0 port. Network 2 LED = ETH1 port).
- Connect one end of the power cable into the rear of the appliance and connect the other end to a power supply.
- Connect cables to your monitor and keyboard (you can use the USB ports or specific ports for your connections).
- If necessary, you could connect a cable from the dedicated IPMI port to a remote management switch (via network) and assign the IP address to the dedicated port in the BIOS setup.
Note: The default password for IPMI access is ARCADMIN (case-sensitive). Please change it to some other value as soon as possible. Refer to the Arcserve UDP Appliance User Guide for instructions on how to change the default password.
- If necessary, connect the cable from the optional external storage device to the external storage port.
Copyright © 2016 .
All rights reserved.
|
|