

Generating exchange catalog is necessary to restore the Exchange Mail. The catalog is generated automatically if you enabled the Generate Exchange catalogs (for Granular Restore) option while adding schedule for the Host-based agentless backup plan. The corresponding Exchange Granular Restore catalogs are generated during each backup. These catalogs help you to perform granular recoveries (at mailbox, mailbox folder, and or mail item levels) by letting you browse and select exactly which Exchange object you want to recover.
If you have not enabled the Generate Exchange catalogs (for Granular Restore) option when you created the plan, then you must generate now.
Depending upon your action when you add schedule to the Host-based agentless plan, the catalog status in the Mailbox Database displays the following two options:
Before you perform the restore, you can generate the catalog manually from the Restore Exchange Mails dialog.
Follow these steps:
a. Log in to Arcserve UDP.
b. Click the resources tab.
c. Select All Nodes in the left pane.
All the added nodes are displayed in the center pane.
d. In the center pane, select the virtual machine node that you have used for the host-based plan, and click Actions.
e. Click Restore from the Actions drop-down menu.
The restore method selection dialog opens.
The Restore Exchange Mail dialog opens.
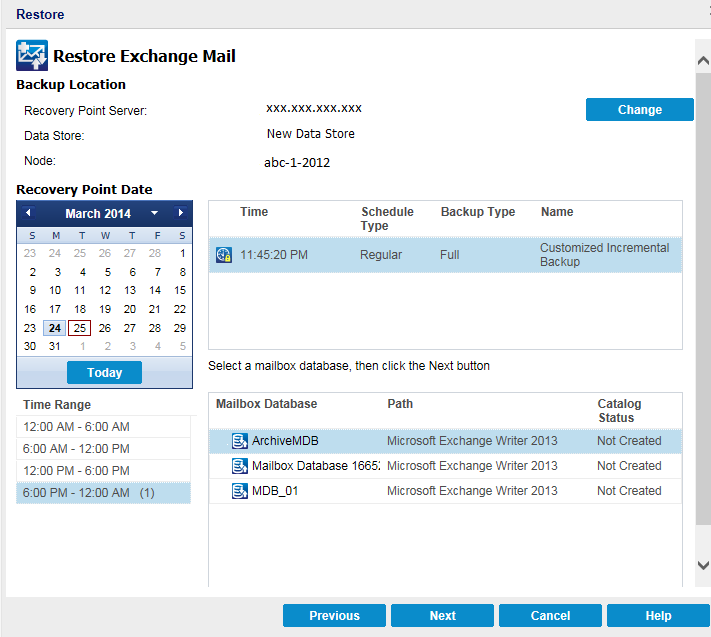
The calendar view will highlight (in green) all dates during the displayed time period that contain recovery points for that backup source.
The corresponding Exchange mailbox databases for that date are displayed, along with the time of the backup, the type of backup that was performed, and the name of the backup.
The Submit Exchange Granular Restore Catalog Job dialog displays informing you that the Exchange Granular Restore catalog has not been generated for the selected database and asking you if you want to generate the catalog now.
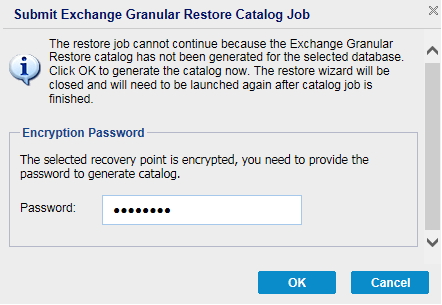
The Exchange Granular Restore catalog for the selected database is generated. The process of generating a catalog could be time-consuming depending upon the size of the database.
During the catalog generating process, the Job Monitor displays information about the ongoing event, with the estimated time remaining to complete the catalog job.
Note: If you select Cancel for generating a catalog now, you cannot browse to or cannot select a granular recovery point. As a result you can only perform a full database restore.
The granular restore can now be continued.
Note: If you attempt to click Next while the catalog is still being generated, a pop-up message appears informing you of this condition.
The Exchange Granular Restore catalog is generated.
|
Copyright © 2015
|
|