

The Advanced tab lets you specify some advanced settings for the backup job. The advanced settings include providing snapshot type for backup, truncate log settings, providing the location of any scripts, and email settings. Review the prerequisites before you select the hardware snapshot type.
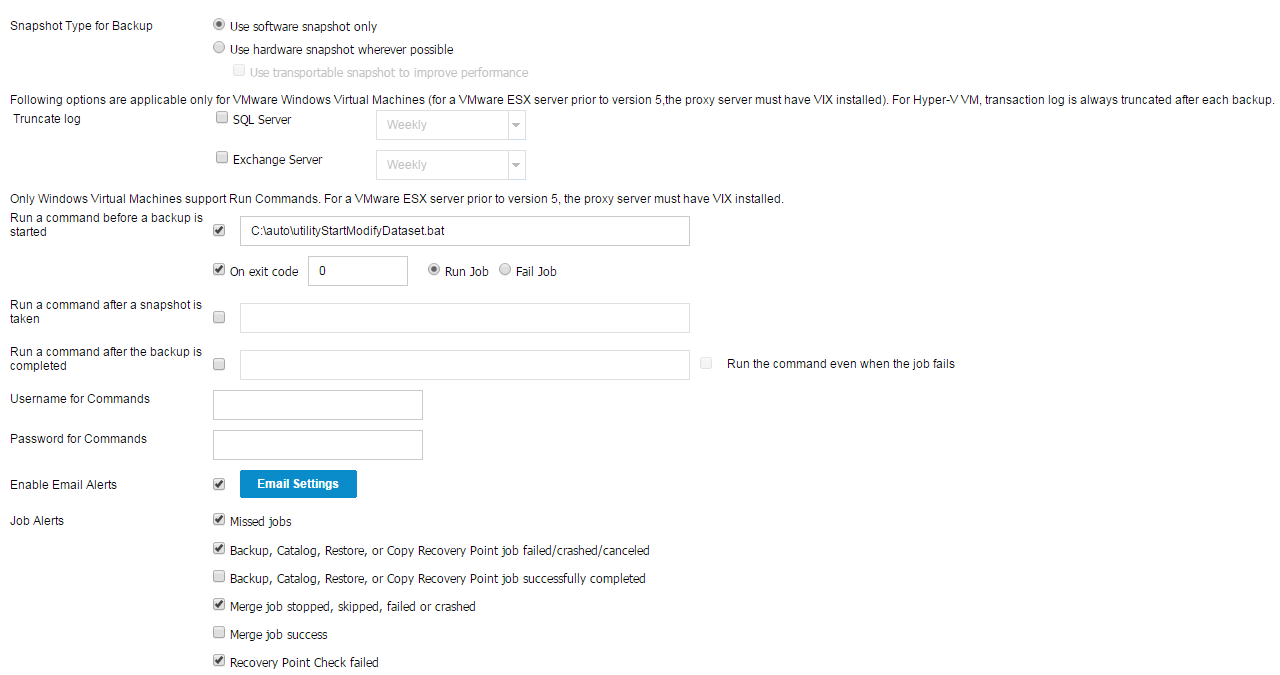
The following image displays the Advanced tab:
Follow these steps:
Select one of the following options for the backup snapshot.
Specifies that the backup type uses only the software snapshot. Arcserve UDP will not check for hardware snapshot. The software snapshot utilizes less resources on the virtual machines. You can use this option if the server has lower configurations and processing speed.
Specifies that the backup type first checks for a hardware snapshot. If all the criteria are met, the backup type uses hardware snapshot.
Note: For more information on the hardware snapshot criteria, see the prerequisite.
For Hyper-V, Arcserve UDP uses the hardware provider to take a VSS snapshot of the volumes on the Hyper-V host and import the hardware snapshot to the proxy server. The proxy server must have a suitable hardware provider installed. For VMware, Arcserve UDP creates vSphere software snapshot for a brief period and then creates a hardware snapshot. This hardware snapshot is mounted on the VMware ESX server and the software snapshot is deleted. Arcserve UDP then uses the contents in the hardware snapshot to back up the VM related files.
Specifies that the hardware snapshot uses a transportable snapshot. A transportable snapshot increases the backup throughput. This option is applicable for Hyper-V servers only.
Let you specify the schedule to truncate logs for SQL Server and Exchange Server. You can specify the schedule as Daily, Weekly, or Monthly. This is applicable only for VMware.
Let you run a script before the backup job starts. Specify the path where the script is stored inside the guest OS of the virtual machine. Click On exit code and specify the exit code for Run Job or Fail Job. Run Job indicates that the backup job will continue when the script returns the exit code. Fail Job indicates that the backup job will stop when the script returns the exit code. This is applicable only for Windows VM.
Notes: (also applicable for the After snapshot is taken and After backup is completed commands)
[HKEY_LOCAL_MACHINE\SOFTWARE\Arcserve\Unified Data Protection\Engine\AFBackupDll]
[HKEY_LOCAL_MACHINE\SOFTWARE\Arcserve\Unified Data Protection\Engine\AFBackupDll\<vm instance uuid>]
Note: If you add the registry value in both the VM and proxy level registry, then the setting in the VM level registry will have the priority over the setting in the Proxy level registry.
Lets you run a script after the backup snapshot is taken. Specify the path where the script is stored inside the guest OS of the virtual machine. This is applicable only for Windows VM.
Lets you run a script after the backup job is completed. Specify the path where the script is stored inside the guest OS of the virtual machine. This is applicable only for Windows VM.
If this check box is selected, the script specified in "Run a command after a backup is completed" is executed even when the backup job fails. Otherwise, that script is executed only when backup job completes successfully.
Lets you specify the username to run the commands.
Let you specify the password to run the commands.
Lets you enable email alerts. You can configure email settings and specify the types of alerts that you want to receive in an email. When you select this option, the following options are enabled for your selection.
Lets you configure the email settings. Click Email Settings and configure the email server and proxy server details.
Lets you select the types of job alert emails that you want to receive.
Note: When you select a node as a backup source or backup proxy, Arcserve UDP checks whether the agent is installed on the node and if it is the latest version. Arcserve UDP then displays a verification dialog that lists all the nodes that either have an outdated version of the agent or does not have the agent installed. To install/upgrade the agent on these nodes, select the installation method and click Save.
The changes are saved and a green checkmark is displayed next to the task name. The plan page closes.
Note: If you have to add another task, you must select the plan from the resources tab and modify the plan. To modify the plan, click the plan from the center pane. The plan opens and you can modify it.
The plan is automatically deployed to the source virtual machine node.
The host-based agentless backup plan for the virtual machine is created. The backup runs per the schedule that you have configured in the Schedule tab. You can also perform a manual backup at any time.
|
Copyright © 2016
|
|