Previous Topic: How to Manually Install Network File System on a Windows ServerNext Topic: Submit the Instant Virtual Machine Job


Specify the Instant Virtual Machine Details

Specify the details for the Instant VM. The options may vary depending on the hypervisor.

Follow these steps:

  1. Specify the name and description of the Instant VM.
    VM Name

    Specifies the name of the Instant VM. You can only specify itme as the prefix or suffix of the Instant VM. The name of the source node becomes the default name of the Instant VM. The name of the source node with a prefix is the default name of the Instant VM. Some special characters are not allowed in the name, such as ‘@’, ‘\’ and so on.

    Description

    (Optional) Specifies the description for the Instant VM.

  2. Specify the folder location of the Instant VM on the recovery server.

    You can browse the volume information of the recovery server.

  3. Specify the Instant VM settings.
    CPU Count

    Specifies the number of CPU that you would require in the Instant VM.

    Memory Size

    Specifies the size of memory that you would require in the Instant VM.

  4. Add network adapters.

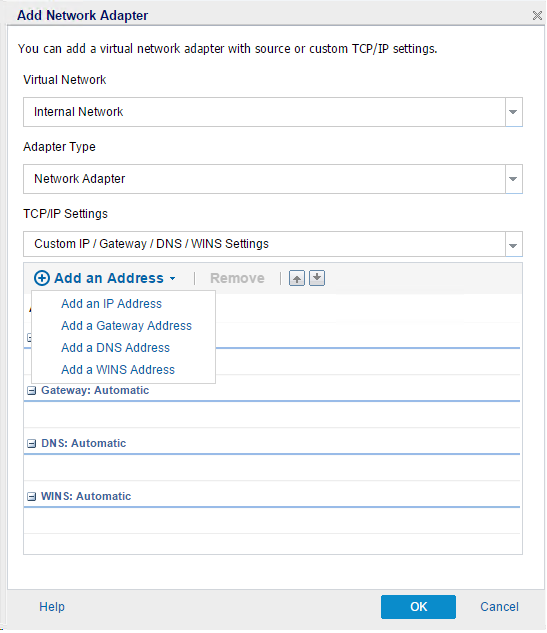
    Note: For a Linux Instant VM, at least one virtual NIC can be used to connect to Linux Backup Server.

    1. Click the Add an Adapter button to add an adapter and specify the details of the network.

      Network adapters

      You can add multiple network adapters. After adding a network adapter, you can edit and delete the network adapter from the Actions column.

    2. Specify the Virtual Network, Adapter Type, and TCP/IP Settings. If you want to specify the IP address of the Instant VM, you can click Add an Address and select the address you want to configure.

      Add network adapters

  5. Update DNS.

    Note: This feature is only available for Windows Instant VM.

    1. Click the Update DNS button to specify DNS details.

      Update DNS

      Note: You can specify the Update DNS detail information if you have specified an IP address and DNS address in the Network Adapter and the source machine is in a domain.

    2. Click Add a DNS Address to add a DNS update record. Click Remove to remove DNS update record. Click Up and Down button to adjust the sequence of the records.

      Customize DNS Update Settings

    3. Select a DNS Address and an IP Address from the drop-down list and then click OK.
    4. Specify the Time to Live (TTL).
    5. Specify the DNS Authentication.

      For Microsoft DNS Server, enter the username and password. For Bind Server, you need to specify the full path, including the file name of the key file in the Recovery Server.

  6. Change the Instant Virtual Machine hostname.
    1. Click the Change Host Name checkbox to update the hostname of the Instant Virtual Machine.

      Change Instant VM hostname

    2. Specify a New Host Name for the Instant Virtual Machine. If the source machine is in a domain, provide the User Account and password.

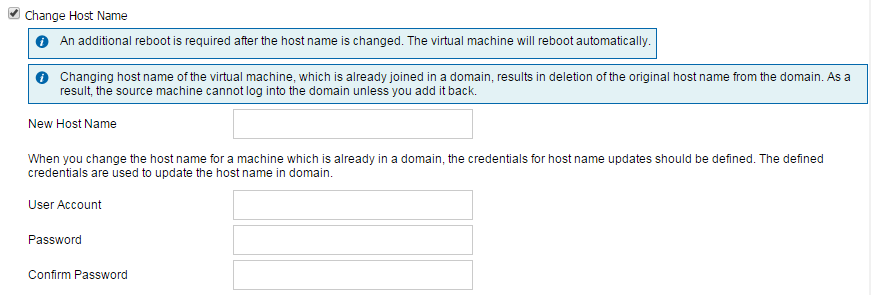
    Note: If the source machine is in a domain, the account should have the permission to change the hostname in domain.

Now you can submit the job.